When something breaks or stops working at home, the choice often feels like: wait days for help or live with the annoyance. There’s a better middle ground. With a few basic tools and a clear plan, you can safely handle a surprising number of small fixes yourself—in less time than it takes to scroll social media. This playbook walks you through five practical quick fixes, step by step, so you can get things working again without turning it into an all-day project.
---
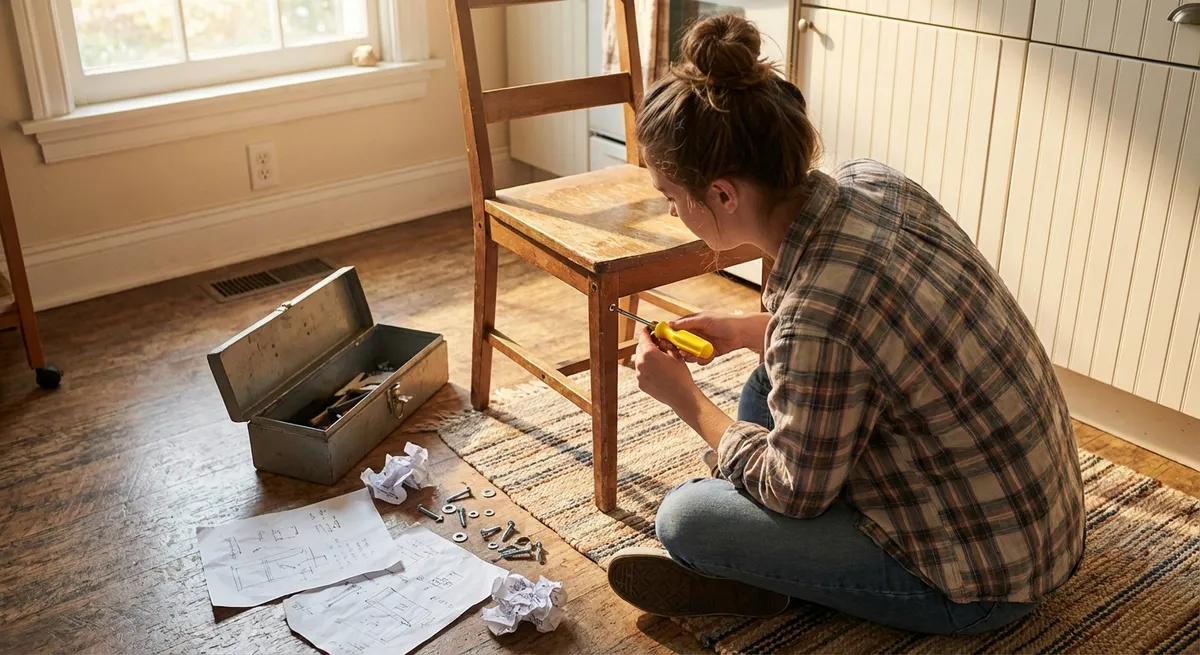
Fix 1: Wobbly Chair or Table That Won’t Sit Still
A wobbly chair or table is more than annoying—it can become unsafe if you ignore it. Most of the time, the problem is loose fasteners or uneven legs, not a major structural failure. Here’s how to stabilize it quickly.
Tools & materials (pick what you need):
- Screwdriver (Phillips or flat-head, depending on screws)
- Allen key/hex key (for furniture with hex bolts)
- Wood glue (for loose wooden joints)
- Felt pads or cardboard shims (for uneven legs)
- Clean rag
Step-by-step:
**Flip and inspect**
Turn the chair or table upside down on a soft surface (rug or blanket) to avoid scratches. Wiggle each leg and joint to find which parts move.
**Tighten all fasteners**
Use the correct screwdriver or Allen key to snug up every visible screw or bolt, not just the loose ones. Tightening all points distributes the load and often solves the wobble immediately. Don’t overtighten—stop when it’s firm and the wood or metal isn’t compressing.
**Reinforce loose wooden joints (if needed)**
If a wooden joint moves even after tightening, loosen that joint slightly, wipe away dust with a rag, then apply a thin bead of wood glue into the joint. Re-tighten the screw/bolt to clamp the joint together and wipe away excess glue. Let it cure per label instructions (often 30–60 minutes for basic handling, longer for full strength).
**Level the legs**
Flip the furniture upright on a hard, flat surface. Gently rock it to find which leg is short or high. If one leg doesn’t touch the floor, add a felt pad to that leg. For a more custom fit, stack thin cardboard or an extra felt pad under the short leg until it’s stable, then secure with strong tape or glue.
**Test under real use**
Sit on the chair or press down on the table from different angles. If it still wobbles, re-check bolts and add additional shimming. Once stable, make a note to re-check screws in a month; many new or flat-pack pieces need a second tightening after some use.
---
Fix 2: Door That Won’t Latch or Keeps Swinging Open
When a door won’t stay closed or keeps drifting open, it’s usually a small alignment issue—not a sign you need a new door. Most problems come from sagging hinges or a misaligned strike plate.
Tools & materials:
- Phillips screwdriver
- Small wood shims or toothpicks
- Wood glue (optional but helpful)
- Pencil
- Utility knife or sandpaper (for minor adjustments)
Step-by-step (for a door that won’t latch):
**Check how it’s missing the latch**
Close the door slowly and watch where the latch meets the strike plate on the frame. Is it hitting too high, too low, or not going in far enough?
**Tighten hinge screws**
Open the door and tighten all hinge screws on both the door and the frame. Focus especially on the top hinge—this one largely controls sagging. If a screw just spins and won’t tighten, skip to step 3 for reinforcement.
**Reinforce stripped hinge screws**
Remove the loose screw. Insert 2–3 wooden toothpicks (or a small bit of wood shim) coated lightly with wood glue into the hole. Break them flush with the surface, then reinsert the screw. The added wood gives the screw fresh material to bite into.
**Re-test the latch alignment**
Close the door again. Often, tightening and reinforcing the hinge screws will lift or lower the door just enough for the latch to catch correctly.
**Adjust the strike plate (if needed)**
If the latch still hits too high or low, remove the strike plate screws and gently shift it in the needed direction. Use the existing mortise (recess) as a guide; a small movement can make a big difference. Retighten screws and test. For very minor adjustments, lightly file or sand the opening of the strike plate instead of moving it.
For a door that swings open by itself:
**Identify the problem hinge**
Open and release the door from various positions. If it slowly swings, the hinges are slightly out of plumb.
**Try the hinge-pin bend trick**
Pull out the top hinge pin using a screwdriver and hammer (tap upward from below if needed). Place the pin on a hard surface and give it a very gentle bend in the middle using a hammer. Reinsert the pin. The added friction can keep the door from drifting.
**Test and adjust**
If it still swings, lightly bend the middle hinge pin as well. Don’t overdo it; too much bend makes the door harder to open and close.
---
Fix 3: Slow or Clogged Sink Drain
A slow drain is usually caused by hair, soap scum, or grease—not a deep pipe blockage. You can clear most mild clogs safely without resorting to harsh chemicals that can damage pipes over time.
Tools & materials:
- Rubber gloves
- Bucket or large bowl
- Old toothbrush or small cleaning brush
- Zip-it style drain cleaning tool or a straightened wire hanger
- Baking soda and white vinegar (optional natural cleaner)
- Plunger (cup-style for sinks)
Step-by-step:
**Remove visible gunk at the stopper**
If there’s a drain stopper, lift it out. Many pull straight up; some require loosening a small nut/rod under the sink first. Clean off hair and debris using gloves and a brush.
**Use a drain cleaning strip**
Insert a plastic drain-cleaning strip or a bent wire hanger into the drain. Gently pull up hair and sludge. Repeat until the strip comes up relatively clean.
**Flush with hot water**
Run very hot (not boiling) water down the drain for 30–60 seconds to help clear soap and minor grease buildup.
**Try a natural cleaner (optional)**
Pour about half a cup of baking soda into the drain, followed by half a cup of vinegar. Let it fizz for 10–15 minutes, then rinse with hot water. This won’t fix severe clogs but helps with buildup and odor.
**Use a plunger if it’s still slow**
Block any overflow holes with a damp cloth. Fill the sink with enough water to cover the plunger cup. Give several strong plunges, then quickly pull up. Test the drain. Repeat a couple of times if needed.
**Check the P-trap (if still blocked and you’re comfortable)**
Place a bucket under the curved pipe (P-trap) under the sink. Unscrew the slip nuts by hand or with adjustable pliers. Remove the trap, clear out debris, then reassemble. Hand-tighten and test for leaks while running water.
---
Fix 4: Window That Won’t Stay Open
A window that slams shut is both frustrating and dangerous. The fix depends on the type of window, but many older double-hung windows and lightweight modern ones can be stabilized quickly without replacing the entire mechanism.
Tools & materials:
- Flat-head screwdriver
- Wooden dowel, stick, or cut-to-length piece of trim
- Silicone spray lubricant (for sticky tracks)
- Tape measure
- Utility knife (for minor track cleaning)
Step-by-step (for a standard up-and-down window):
**Confirm the problem**
Open the window halfway and gently let go (while staying ready to catch it). If it drops, the sash support system (cords, springs, or balances) isn’t holding properly.
**Clean and lubricate the tracks**
Close the window. Use a vacuum to remove dust and debris from the side tracks. For vinyl or metal windows, wipe with a damp cloth, then apply a very light amount of silicone spray to the track and move the window up and down a few times.
**Check for visible damage**
Look for broken sash cords (older wood windows) or disconnected spring balances (newer ones). If you see a broken cord or detached spring, that’s a larger repair, but the next steps provide a safe short-term workaround.
**Measure for a support stick**
Open the window to your usual comfortable height. Measure from the bottom inside edge of the sash (the moving part) to the inside bottom of the frame. Cut a wooden dowel or trim piece to that length.
**Install the temporary support**
Place the stick vertically in the track so that when the window is lowered, it rests firmly on the stick. Test gently to ensure it holds and doesn’t slip. Use one stick per side for larger windows.
**Plan a long-term fix**
This support solution is safe and practical for everyday use if placed properly, but note which side seems to fail and schedule time later to replace sash cords or balances using the manufacturer’s instructions or a window pro.
---
Fix 5: Power Strip or Outlet That Seems “Dead”
Before assuming major electrical trouble, it’s worth doing a controlled, basic check. Many “dead” outlets and power strips are simply tripped, switched off, or connected to a GFCI that needs resetting. You should only attempt low-risk checks; anything more involved calls for an electrician.
Safety first:
If you see burn marks, smell burning, or hear buzzing from an outlet, stop and call a professional immediately. Do not attempt to use or open it.
Tools & materials:
- A small plug-in device (lamp/phone charger) you know works
- Access to your home’s breaker panel
- Flashlight (if needed)
Step-by-step:
**Test the device, not just the outlet**
Plug your lamp or charger into a different outlet you know is working to verify the device itself is fine.
**Check power strip switch and reset**
If you’re using a power strip, make sure its power switch is on. Some surge protectors also have a small reset button—press it firmly and test again.
**Look for a GFCI outlet upstream**
Kitchens, bathrooms, garages, and outdoor outlets often share a circuit with a GFCI (Ground Fault Circuit Interrupter) outlet that has “Test” and “Reset” buttons. Even if your dead outlet isn’t a GFCI style, a tripped GFCI elsewhere on the same circuit can kill power downstream. Press the **Reset** button on any GFCI you find, then test the outlet again.
**Check your breaker panel**
Go to your electrical panel and look for any breaker that’s in the middle or off position. Many tripped breakers don’t look dramatically different. Firmly switch the suspect breaker **off**, then **back on**. Return to your outlet and test.
**Stop at the panel**
If the outlet is still dead after GFCI and breaker checks, or if it keeps tripping breakers, don’t open the outlet cover or panel yourself unless you’re qualified. At that point, it’s time to call a licensed electrician and describe the steps you’ve already taken.
---
Conclusion
Quick fixes don’t have to be complicated, and they don’t require a workshop full of tools. By tackling small problems—wobbly furniture, misaligned doors, slow drains, unsafe windows, and “dead” outlets—with simple, methodical steps, you prevent bigger issues and cut down on stress. The key is knowing where to stop: handle the low-risk, surface-level repairs yourself and call in pros when the job moves into structural, electrical, or complex mechanical territory. Over time, these small wins build your confidence, save you money, and keep your home running smoothly.
---
Sources
- [U.S. Consumer Product Safety Commission – Home Maintenance Safety Tips](https://www.cpsc.gov/Safety-Education/Safety-Guides/home) - General safety guidance for tackling basic home tasks and knowing when to call a professional
- [Family Handyman – How to Fix a Door That Won’t Latch](https://www.familyhandyman.com/project/how-to-fix-a-door-that-wont-latch/) - Detailed examples of latch and strike plate adjustments similar to those described
- [This Old House – How to Clear Any Clogged Drain](https://www.thisoldhouse.com/plumbing/21015237/how-to-clear-any-clogged-drain) - Step-by-step drain-clearing methods and when to avoid chemical cleaners
- [Energy.gov – Window Types and Maintenance](https://www.energy.gov/energysaver/types-windows) - Background on window types and mechanisms, useful for understanding sash and balance issues
- [NFPA – Electrical Safety in the Home](https://www.nfpa.org/Education-and-Research/Home-fire-sprinkler-initiative/Resources/Electrical-safety-in-the-home) - Safety-focused guidance on handling electrical issues and recognizing danger signs
Key Takeaway
The most important thing to remember from this article is that this information can change how you think about Quick Fixes.


