Life doesn’t pause just because something breaks. A dripping faucet, a dead outlet, or a wobbly chair can go from minor annoyance to real headache if you ignore it. The good news: you can solve a surprising number of these issues yourself with basic tools and a clear plan.
This guide walks you through five practical, common problems and shows you exactly how to fix them step‑by‑step. No fluff, no complicated jargon—just what to do, in what order, so you can get back to normal faster.
---
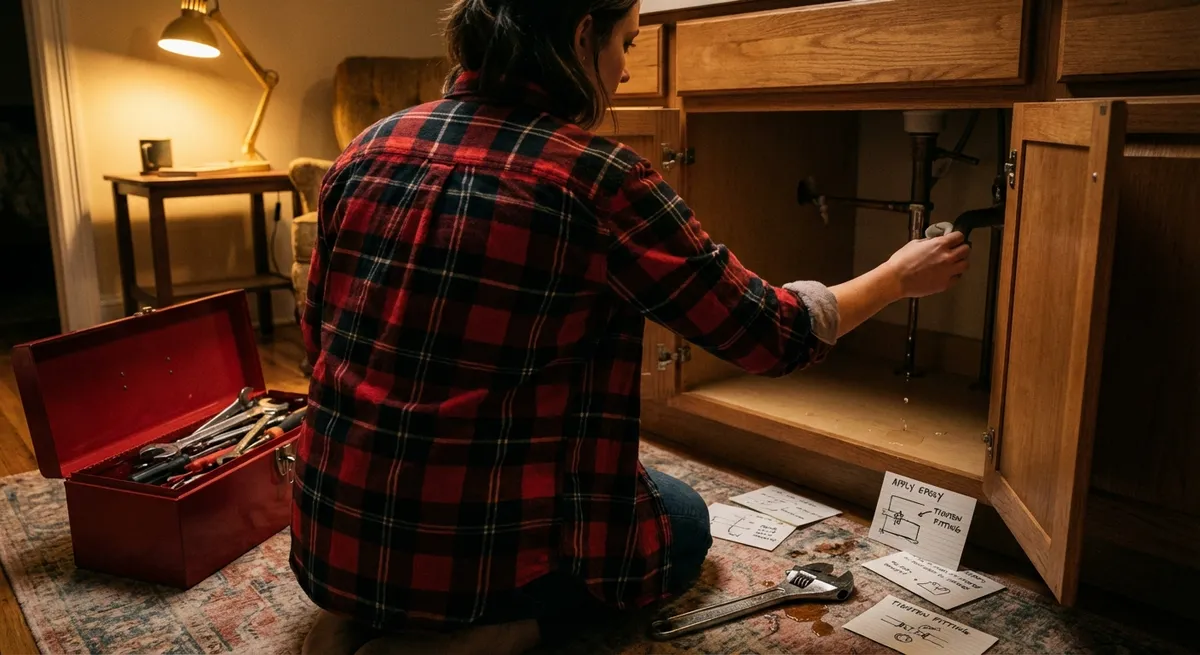
1. Quiet a Dripping Faucet Without Calling a Plumber
A constant drip wastes water, hikes your bill, and makes it harder to sleep. In most cases, the problem is a worn washer or cartridge inside the faucet. You don’t need to replace the whole fixture—just the tiny part that failed.
Step 1: Shut off the water supply
- Look under the sink for two valves (hot and cold).
- Turn both clockwise until they stop.
- Open the faucet to confirm the water is off.
Step 2: Plug the drain and prepare your workspace
- Put the sink stopper in or cover the drain with a rag so small parts don’t fall in.
- Lay a towel in the sink to protect the surface and organize screws/parts.
Step 3: Remove the handle
- Look for a small cap (often with hot/cold markings). Pry it off with a flathead screwdriver.
- Unscrew the handle screw with a screwdriver or Allen key.
- Pull the handle off gently. Wiggle if it’s stuck, but don’t force it.
Step 4: Take out the cartridge or stem
- Under the handle, you’ll see a nut or clip holding the cartridge/stem.
- Loosen the nut with an adjustable wrench or remove the clip with pliers.
- Pull the cartridge or stem straight up. Note its orientation or take a quick photo.
Step 5: Inspect and replace worn parts
- Check rubber washers and O‑rings—if they’re cracked, flattened, or brittle, that’s your leak.
- Take the stem/cartridge and washers to a hardware store and get exact matches.
- Reinstall the new parts in the same order and orientation.
Step 6: Reassemble and test
- Tighten the nut snugly but don’t over‑torque it.
- Reattach the handle and decorative cap.
- Turn the water supply back on slowly and check for leaks while the faucet is off and on.
---
2. Revive a “Dead” Outlet Safely and Quickly
When an outlet suddenly stops working, it’s not always an “electrician only” job. Often it’s a tripped GFCI, a flipped breaker, or a loose plug connection you can address yourself—as long as you respect basic safety and know when to stop.
Step 1: Confirm the outlet is really the problem
- Plug something else into the outlet (a lamp or phone charger).
- Plug the original device into a different outlet to confirm the device isn’t broken.
Step 2: Check for a nearby GFCI outlet
- Look for outlets with “TEST” and “RESET” buttons in kitchens, bathrooms, garages, and basements.
- If one is tripped, press RESET firmly until it clicks.
- Test the “dead” outlet again—GFCIs often protect multiple outlets in a row.
Step 3: Inspect the breaker panel
- Find your main electrical panel (basement, hallway, utility room).
- Look for a breaker that’s not fully ON or sits between ON and OFF.
- Flip it all the way OFF, then firmly back ON.
- Test the outlet again.
Step 4: Check the outlet face and plug fit (with power OFF)
- If the outlet is loose in the wall or the plug falls out easily, you likely have worn contacts or a loose mounting bracket.
- Turn the breaker for that circuit OFF and verify the outlet is dead with a non‑contact voltage tester if you have one.
- Remove the outlet cover with a screwdriver.
Step 5: Tighten or replace the outlet
- If the outlet itself is physically wobbling, tighten the mounting screws holding it to the electrical box.
- If plugs fall out easily or there’s visible damage, replace the outlet:
- Note wire positions (take a photo).
- Disconnect one wire at a time and attach it to the same position on the new outlet (hot to brass, neutral to silver, ground to green).
- Tighten screws securely; push wires back gently; reinstall the cover.
Step 6: Restore power and test
- Turn the breaker back ON.
- Plug in a small device to test.
- If the outlet still doesn’t work, gets hot, or you see any burning, stop and call an electrician.
---
3. Fix a Wobbly Chair Before It Collapses
That shaky chair isn’t just annoying—it’s one bad lean away from snapping. The fix is usually tightening loose joints and reinforcing the structure so it can handle daily use again.
Step 1: Flip the chair and inspect every joint
- Turn the chair upside down on a table or floor.
- Wiggle each leg and connection point to find the looseness.
- Look for gaps in joints, missing screws, or cracked glue lines.
Step 2: Tighten existing screws and bolts
- Use a screwdriver or hex key to snug every visible fastener.
- Tighten both sides of the chair evenly to avoid twisting the frame.
- Test for wobble again; sometimes this alone solves the issue.
Step 3: Add wood glue to loose joints
- For joints that move or have gaps, gently pull them apart just enough to see the seam.
- Apply wood glue into the joint (a small brush or toothpick helps to work it in).
- Press the joint back together firmly and wipe off excess glue with a damp cloth.
Step 4: Clamp and support while drying
- Use clamps to hold the glued joints tight. If you don’t have clamps, use strong straps or rope with padding to avoid marks.
- Check that the chair sits level before leaving it to dry.
- Let the glue cure according to the label (usually several hours or overnight).
Step 5: Reinforce weak areas
- For chairs that have broken before, add small metal corner braces under the seat where legs meet the frame.
- Pre‑drill small pilot holes so you don’t split the wood.
- Attach braces with short screws that won’t poke through the seat surface.
Step 6: Final test on a flat surface
- Once everything is dry, place the chair on a hard, flat floor.
- Sit, shift your weight, and gently rock to check for movement.
- If it still wobbles slightly, add felt pads under the shorter leg and re‑check.
---
4. Stop a Toilet From Running Nonstop
A running toilet can waste hundreds of gallons of water a day, but the fix is usually inside the tank and takes minutes—not a full replacement. You’ll be working with clean tank water, not the bowl.
Step 1: Remove the tank lid and observe
- Carefully lift the lid and set it somewhere safe (it’s heavy and fragile).
- Flush once and watch what happens inside: where is water flowing after the flush is “done”?
Step 2: Check the flapper seal
- The rubber flapper at the bottom of the tank should drop and seal once the tank refills.
- If it’s warped, cracked, or doesn’t sit flat, water will keep seeping into the bowl.
- Turn off the water valve behind the toilet, flush to empty most of the tank, then unhook the flapper.
Step 3: Replace the flapper
- Take the old flapper to a hardware store to match style and size.
- Clip the new flapper onto the overflow tube and hook the chain to the flush handle arm.
- Adjust chain length: there should be a bit of slack, but not so much that the flapper can’t lift fully.
Step 4: Adjust water level
- Turn the water back on and let the tank fill.
- The water line should be about an inch below the top of the overflow tube.
- For float‑cup fill valves: pinch the metal spring clip or turn the adjustment screw to raise/lower the float.
- For older ball floats: bend the float arm slightly downward to lower the water level.
Step 5: Test for silent operation
- Flush several times and listen. The running sound should stop within a minute.
- Add a few drops of food coloring to the tank and wait 15–20 minutes without flushing.
- If color appears in the bowl, the flapper isn’t sealing and may need a second adjustment or replacement.
---
5. Unstick a Jammed Window So It Opens Smoothly Again
Windows that barely budge aren’t just annoying—they block ventilation and can be a safety issue. Often, paint buildup, dirt in the tracks, or minor misalignment are to blame, and you can fix these without replacing the whole window.
Step 1: Identify where it’s stuck
- Try opening the window gently from both sides (left/right for sliders, bottom corners for double‑hung).
- Note whether the problem is at the bottom, top, or along the sides.
- Don’t force it—too much pressure can crack the glass.
Step 2: Cut through paint and caulk bridges
- For painted wooden windows, run a sharp utility knife along the edges where the sash meets the frame.
- Score all the way around, including exterior edges if accessible.
- Use a thin putty knife to gently separate any paint bridges.
Step 3: Clean and lubricate the tracks
- Vacuum dirt, dust, and debris out of the window tracks.
- Wipe the tracks with a damp cloth and mild soap if needed; let them dry.
- Apply a silicone‑based spray or a dry Teflon lubricant lightly along the tracks (avoid oil‑based sprays that collect dirt).
Step 4: Free up stubborn double‑hung windows
- With the window unlocked, place your hands near the bottom corners of the sash.
- Rock it gently—push up on one side while slightly easing down the other, then alternate.
- Once it moves a bit, keep working it up slowly, re‑lubricating if needed.
Step 5: Check for alignment and hardware issues
- Inspect the side channels, balances, or springs (depending on window type) for visible damage or disconnection.
- Tighten any loose screws on the sash locks and guides.
- For vinyl windows with removable sashes, follow the manufacturer’s instructions to tilt or lift them out, then reseat them squarely.
Step 6: Test smooth operation and set a maintenance habit
- Open and close the window several times after cleaning and lubrication.
- If it sticks again in the same spot, lightly sand any swollen wood areas (for wooden frames) and touch up with paint or sealant.
- Plan to clean tracks and reapply lubricant once or twice a year to prevent future jams.
---
Conclusion
Most everyday breakdowns don’t need to turn into full‑blown emergencies or expensive service calls. When you understand what’s actually going wrong—a worn washer, a loose joint, a sticky track—you can often fix it yourself with a methodical approach and simple tools.
Use this guide as a practical playbook: shut things off, inspect calmly, replace the small failing parts, and test your work. The more of these quick rescues you handle yourself, the more capable and confident you’ll feel the next time something at home decides to fail at the worst possible moment.
Key Takeaway
The most important thing to remember from this article is that this information can change how you think about DIY Solutions.


